Back
from the dead Boys n' Girls! I've got a new series starting today, expanding the scope of this blog. Inspired by the classic Big Beat anthem from Norman Cook, no longer will I be confined to tear downs, but post some build ups as well! I recently finished one of my favorite projects ever, and I thought I'd share the results.
Silicone casting is a blast.
I recently bought a Mazda 3 and I was looking at ways I could add a bit of a unique touch to it - something to make it mine. I thought of most of the common things; one particularly kitschy option was to switch out my stick shift knob. I didn't give it much thought until I was absent mindedly looking at a series of fine art ceramic heads I made a few years ago which were sitting up on a shelf in my parents house. Something clicked - one of them was perfectly shaped, smooth and bald, and small enough to fit in one's hand. It would make an epic shifter knob. Oh yes.
 |
| The ideal candidate on the right. |
I knew instantly I'd have to make a reproduction of it - the original has too much sentimental value. The only way I knew how to make a 'perfect' reproduction was to make a casting. I had worked with silicone before when in school, and I knew it was the way to go - a high level of detail and accuracy in the mold, chemical and temperature resistant, and relatively durable so I could make multiple castings if desired.
I jumped online and found a plethora of options. I tried my best to figure out not only which type of silicone to make the mold with (platinum or tin cured?), but which resin to cast the final part with (urethane, epoxy?) These would have been relatively easy to figure out from forums and whatnot, but what really was giving me pause was that the original was a porous, unglazed ceramic - and silicone was notorious for sticking to porous materials. For the life of me I couldn't find anything online talking specifically about casting silicone over unglazed ceramic.
Instead I went old school and sought out the expertise of skilled professionals at a specialized hobby shop. What a novel idea! I visited the fine folks at Reynolds Advanced Materials out by the old Stapelton Airport near Denver. They were fantastically helpful and somehow I walked out of there
spending way more money than originally intended. C'est la vie I suppose. I was told that it almostly surely wouldn't work to cast a porous ceramic like I had. Bummer. But I had driven all the way there and I was dead set on making this fantastic idea a reality, so I bought everything I needed and hoped I could make it work.
I ended up buying a 2lb. kit of a platinum cure silicone, a 2 lb. kit of a black Urethane 2-part resin, and mold release agent (which isn't like PAM, its chemically made not to inhibit the curing of silicone).
Before anything else, though, I had to do an experiment to see whether or not the silicone would even work with ceramic. I set up what you see below - to test out on the bottom of one of my other head sculptures. I wrapped blue tape around the sides, and rubber-banded it tight so the silicone wouldn't leak down. There were two holes in the bottom to vent it during when it was fired, which I plugged up with wooden skewers.
 |
| The view inside. You'll notice the two halves are slightly differently colored. I sprayed the left half with the release agent to see if it would have any affect. |
 |
| With the silicone poured in. It was a 2-part silicone which I probably should have measured out by weight, but instead I just eyeballed the volumes. It cured within 6 hours. |
 |
| Hey, it worked! Nice and rubbery. |
 |
| The moment of truth. It peeled off fairly cleanly, but as you can see, one half had significantly more residue hang on to the crevices of my signature and whatnot - that was the half without the release agent. Based on those results, I would be using the release agent on the full scale casting (which was unfortunate because it causes some discoloration on the brilliant white of the bare fired ceramic. Again, c'est la vie.) |
 |
| To the full scale casting! But first: awwwwwwwww... |
 |
| I had to make some sort of containment system to hold the silicone - turns out the perfect material is simple paperboard, the kind that has a waxy coating. Silicone won't stick to any smooth surface. |
 |
| Measuring the height to make the walls. I wanted roughly 1/2 - 3/4" of space around all surfaces so the final silicone mold would be strong and resist tearing/deforming when casting in it. |
 |
| There you have it. |
 |
| The head was attached to the cardboard bottom with this double-sided foam tape. Double sided duct tape would have worked well too. Anything to make a really good seal. Also note that I sprayed the entire head with the release agent before adding it in. |
 |
| Casting! I eyeballed everything and ended up having to make three separate small batches poured in on each other before I got enough volume in there. I originally was going to measure precisely by adding sand or flour in the cavity but I thought it would be dusty or messy, so I just went without it. There's a 1 hour working time with this brand if memory serves. |
|
|
|
 | | | | | | | | | | | | | |
|
|
|
| Full up to the brim. I added a bunch of steel weights around the tape along the bottom because it started leaking... no big deal really, but annoying. |
 |
| I had a bit left and didn't want it to go to waste, so dad made a quick relief casting of one of his sculptures! |
I should mention that each of the two parts should be mixed really well before adding together, and mixed really well after. This is obvious and necessary but it creates a problem - namely, bubbles. This is a very viscous liquid, and the bubbles can get stuck to the surface of the original piece being cast over. The way to eliminate this correctly is with a vacuum chamber (or perhaps a vibrating table), which I didn't have. Instead, after everything was mixed, I spent 3-5 minutes tapping the container on the table to encourage most of the bubbles to find their way to the surface before pouring.
 |
| After it cured! this is looking at the bottom, with the cardboard removed. You'll notice the indentations where the foam tape was. |
 |
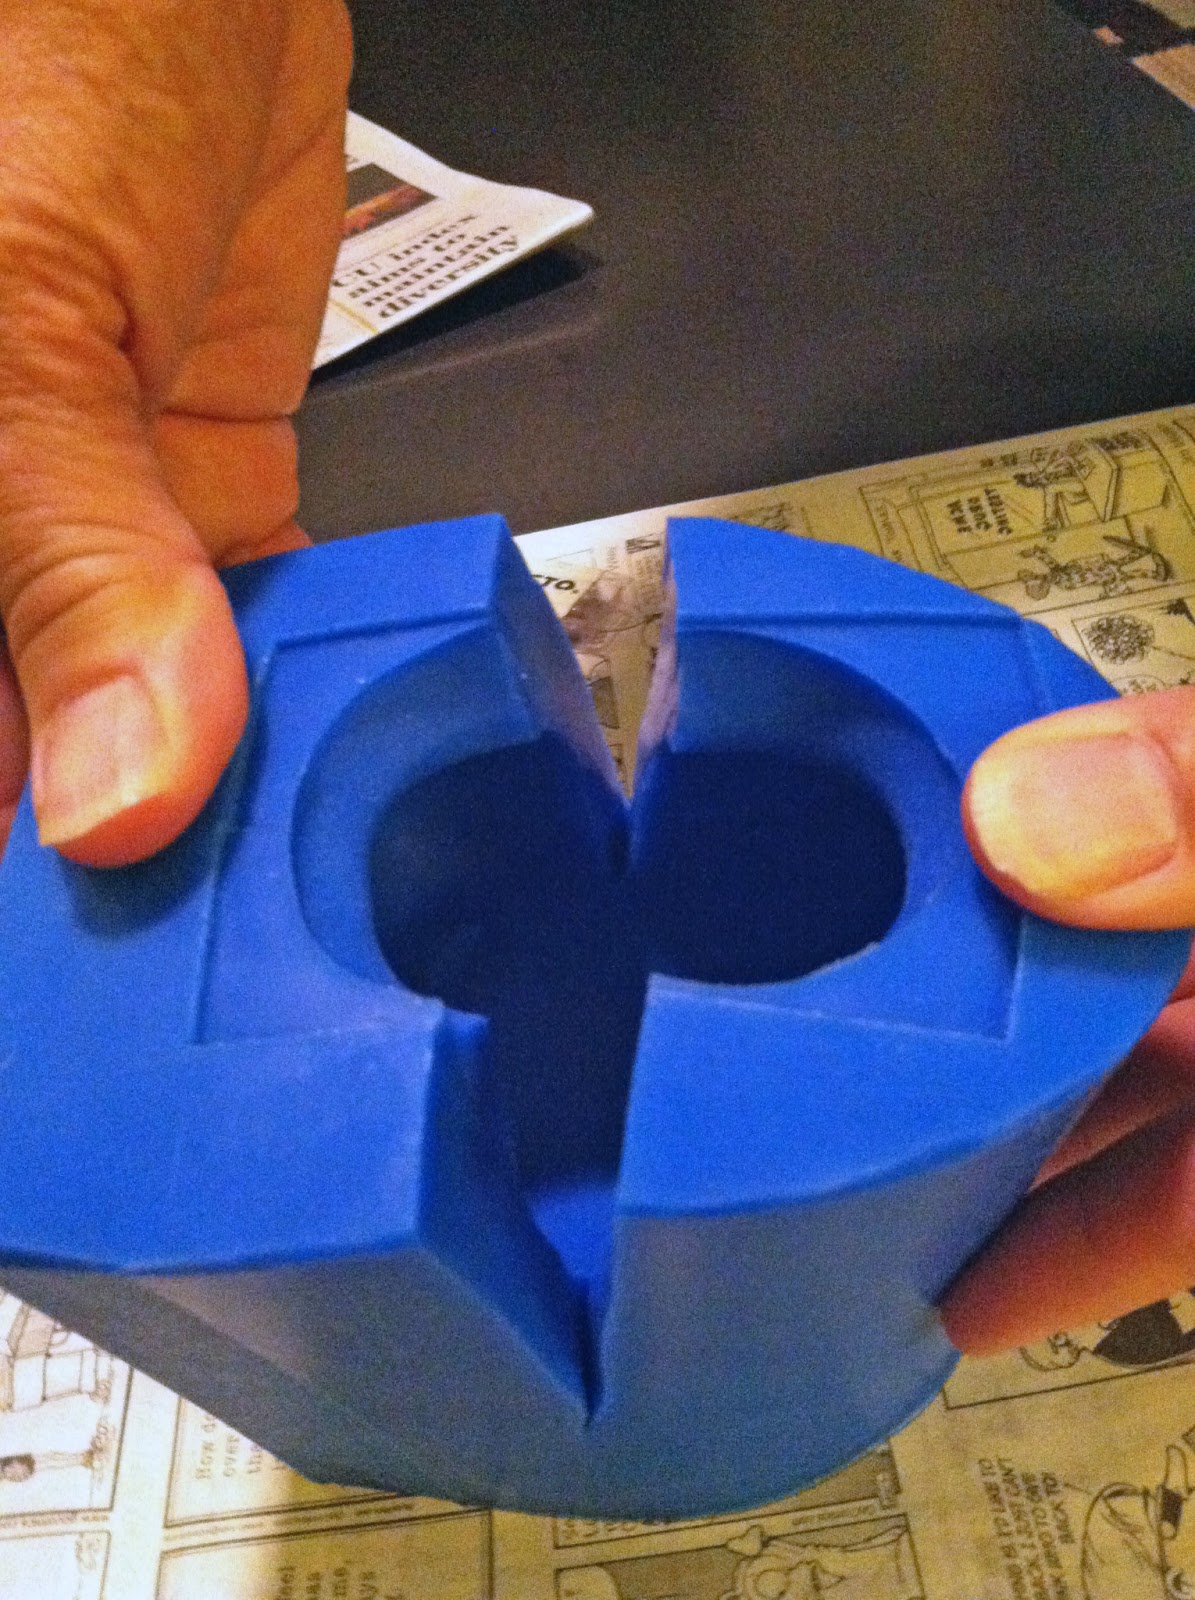
| With the walls removed. Now its just a matter of separating the ceramic head from the big hunk of rubber surrounding it... |
 |
| The surgery was preformed with, what else, but an old surgeons scalpel my dad had, and an x-acto blade. |
 |
| This is a step to be particularly careful with. I had a partner hold apart the flaps as I slowly cut down the side, making sure not to gouge the ceramic, and keep a straight line. |
 |
| I only cut about half way down, minimizing the length of the parting lines which had to be lined up later when casting. |
The next step required power tools. As you may or may not be aware, shifter knobs simply screw on a shaft sticking out of your car's floor. Somehow, through magic, that shaft manipulates the transmission, but we aren't concerned with that. What we're concerned with is what type of threading that shaft has, so we can make a shifter knob with the same threading. With a bit of searching the old interweb I found my Mazda had M10x1.25 threading. By reading this I found out what those numbers correspond to - the shaft is 10mm nominal diameter, and the thread points are 1.25mm apart.
Armed with this information, I went out and bought a carriage bolt and some nuts that fit this threading. I welded together the nuts to give about an inch and a quarter of threading and some other bits of steel so the final casting would have some weight. Shifter knobs are generally fairly heavy, or at least they should be - when shifting it gives a good, solid, well-built feeling. I then used a cutoff wheel to make a bunch of grooves in everything so the resin really had something to grab onto.
 |
| Of course I made sure that this big bulky piece fit in the cavity of my mold without hitting any sides. |
 |
| This is the jig I set up to set the threaded weight in the right place in the mold. I used a level to make sure the surface of the mold was relatively flat. I also sprayed the entire inside of the mold and the shaft of the bolt with the release agent (the bolt will be removed obviously, once the piece is cast, leaving the nuts inside to mount in my car.) |
 |
| You'll notice that the bolt is held in on an angle - I did this so the head would be tilted up once mounted in the car and you could see more detail of the face. |
 |
| With the resin poured in. This was a bit more urgent - there was only a 5 minute working time! I didn't have much time for trying to get the bubbles out, and you'll notice some flaws in the final product, but all-in-all it worked well. Took about an hour to set up. |
 |
| That's a mighty fine casting right there. You'll notice a few bubbles around the nose and neck area. It weighs roughly a pound. |
 |
| Comparison with the shifter knob it replaced. It was roughly the same height and weight. |
 |
| Sexy, or creepy? I choose sexy. |
Couldn't have been happier with the outcome! It works very well - throws nicely, good fit in your hand, and matched the interior well too. Great conversation starter.


No comments:
Post a Comment